相信大多数做过Android APP的同学们都会上传头像,而用户选择的图片可能并不符合我们APP的要求且不美观,所以对于图片尺寸的控制(缩放、拖动、裁剪等)就非常重要了。本文就讲讲我在项目中使用的仿微信上传头像功能,欢迎大家指正。
裁剪图片原理
关于裁剪指定位置的图片原理非常简单,本文中采用的是对屏幕进行截取屏幕,然后再裁剪指定坐标、宽度位置的图片。了解裁剪图片原理后,即可进行编码工作。
自定义裁剪框
如微信上传头像界面,裁剪框的作用是在屏幕上呈现一个白色的矩形边框,边框以外的界面都是半透明的形式。当图片在屏幕中拖动时,可以非常明确地提醒矩形框中的图片才是我们所需要的。以下的代码即自定义裁剪框,大家可看代码中注释,非常简单(即在屏幕中画出一个白色的矩形线框,边框以外的上下左右画出半透明背景)。
在本代码中,自定义了一个OnDrawListenerComplete接口,里面定义了onDrawCompelete方法。它的作用是什么?不知大家仔细观察过微信上传头像功能没,当我们选择图片后,不管图片多大多小,多宽多窄,它总能保证图片的宽度满足裁剪框或者高度满足裁剪框,即按裁剪框的比例缩放图片,这样用户在上传时就非常方便呢。该接口的作用就是当裁剪框绘画完成后即可调用回调函数,进行图片处理,以满足裁剪框的大小。
public class ClipView extends View {
    private Paint paint = new Paint();
    private Paint borderPaint = new Paint();

    /**
     * 自定义顶部栏高度,如不是自定义,则默认为0即可
     */
    private int customTopBarHeight = 0;
    /**
     * 裁剪框长宽比,默认4:3
     */
    private double clipRatio = 0.75;
    /**
     * 裁剪框宽度
     */
    private int clipWidth = -1;
    /**
     * 裁剪框高度
     */
    private int clipHeight = -1;
    /**
     * 裁剪框左边空留宽度
     */
    private int clipLeftMargin = 0;
    /**
     * 裁剪框上边空留宽度
     */
    private int clipTopMargin = 0;
    /**
     * 裁剪框边框宽度
     */
    private int clipBorderWidth = 1;
    private boolean isSetMargin = false;
    private OnDrawListenerComplete listenerComplete;

    public ClipView(Context context) {
        this(context, null);
    }

    public ClipView(Context context, AttributeSet attrs) {
        this(context, attrs, 0);
    }

    public ClipView(Context context, AttributeSet attrs, int defStyle) {
        super(context, attrs, defStyle);

        paint.setAlpha(200);

        borderPaint.setStyle(Style.STROKE);
        borderPaint.setColor(Color.WHITE);
        borderPaint.setStrokeWidth(clipBorderWidth);
    }

    @Override
    protected void onDraw(Canvas canvas) {
        super.onDraw(canvas);

        int width = this.getWidth();
        int height = this.getHeight();
        // 如没有显式设置裁剪框高度和宽度,取默认值
        if (clipWidth == -1 || clipHeight == -1) {
            clipWidth = width - 50;
            clipHeight = (int) (clipWidth * clipRatio);
            // 横屏
            if (width > height) {
                clipHeight = height - customTopBarHeight - 50;
                clipWidth = (int) (clipHeight / clipRatio);
            }
        }
        // 如没有显示设置裁剪框左和上预留宽度,取默认值
        if (!isSetMargin) {
            clipLeftMargin = (width - clipWidth) / 2;
            clipTopMargin = (height - clipHeight) / 2;
        }

        // 防止横屏时,覆盖标题栏
        if (clipTopMargin <= customTopBarHeight) {
            clipTopMargin = customTopBarHeight + 20;
        }

        // 画阴影
        // top
        canvas.drawRect(0, customTopBarHeight, width, clipTopMargin, paint);
        // left
        canvas.drawRect(0, clipTopMargin, clipLeftMargin, clipTopMargin
                + clipHeight, paint);
        // right
        canvas.drawRect(clipLeftMargin + clipWidth, clipTopMargin, width,
                clipTopMargin + clipHeight, paint);
        // bottom
        canvas.drawRect(0, clipTopMargin + clipHeight, width, height, paint);

        // 画边框
        canvas.drawRect(clipLeftMargin, clipTopMargin, clipLeftMargin
                + clipWidth, clipTopMargin + clipHeight, borderPaint);

        if (listenerComplete != null) {
            listenerComplete.onDrawCompelete();
        }
    }

    public int getCustomTopBarHeight() {
        return customTopBarHeight;
    }

    public void setCustomTopBarHeight(int customTopBarHeight) {
        this.customTopBarHeight = customTopBarHeight;
    }

    public double getClipRatio() {
        return clipRatio;
    }

    public void setClipRatio(double clipRatio) {
        this.clipRatio = clipRatio;
    }

    public int getClipWidth() {
        // 减clipBorderWidth原因:截图时去除边框白线
        return clipWidth - clipBorderWidth;
    }

    public void setClipWidth(int clipWidth) {
        this.clipWidth = clipWidth;
    }

    public int getClipHeight() {
        return clipHeight - clipBorderWidth;
    }

    public void setClipHeight(int clipHeight) {
        this.clipHeight = clipHeight;
    }

    public int getClipLeftMargin() {
        return clipLeftMargin + clipBorderWidth;
    }

    public void setClipLeftMargin(int clipLeftMargin) {
        this.clipLeftMargin = clipLeftMargin;
        isSetMargin = true;
    }

    public int getClipTopMargin() {
        return clipTopMargin + clipBorderWidth;
    }

    public void setClipTopMargin(int clipTopMargin) {
        this.clipTopMargin = clipTopMargin;
        isSetMargin = true;
    }

    public void addOnDrawCompleteListener(OnDrawListenerComplete listener) {
        this.listenerComplete = listener;
    }

    public void removeOnDrawCompleteListener() {
        this.listenerComplete = null;
    }

    /**
     * 裁剪区域画完时调用接口
     *
     * @author Cow
     */
    public interface OnDrawListenerComplete {
        public void onDrawCompelete();
    }

}
使用裁剪框
使用裁剪框就非常简单了,将该裁剪框以this.addContentView的方式添加到要使用的Activity中。本代码中,即initClipView方法,至于为什么要在observer.addOnGlobalLayoutListener中初始化裁剪框,是因为本例的顶部栏是自定义的,需等该头部的高度确定以后才能对裁剪框进行初始化,如果你没有使用自定义顶部栏,那么就无所谓了。大家可以看到在observer.addOnGlobalLayoutListener回调接口中,有一大段计算缩放、平移等的语句,这些代码的作用即是上文所讨论的,让用户无论选择多大的图片,都让它满足裁剪框的高宽度。然后再加上针对ImageView容器的拖动、缩放等效果即可。
public class ClipPictureActivity extends Activity implements OnTouchListener,
        OnClickListener {
    private ImageView srcPic;
    private View sure;
    private ClipView clipview;

    private Matrix matrix = new Matrix();
    private Matrix savedMatrix = new Matrix();

    /** 动作标志:无 */
    private static final int NONE = 0;
    /** 动作标志:拖动 */
    private static final int DRAG = 1;
    /** 动作标志:缩放 */
    private static final int ZOOM = 2;
    /** 初始化动作标志 */
    private int mode = NONE;

    /** 记录起始坐标 */
    private PointF start = new PointF();
    /** 记录缩放时两指中间点坐标 */
    private PointF mid = new PointF();
    private float oldDist = 1f;

    private Bitmap bitmap;

    @Override
    public void onCreate(Bundle savedInstanceState) {
        super.onCreate(savedInstanceState);
        setContentView(R.layout.main);

        srcPic = (ImageView) this.findViewById(R.id.src_pic);
        srcPic.setOnTouchListener(this);

        ViewTreeObserver observer = srcPic.getViewTreeObserver();
        observer.addOnGlobalLayoutListener(new OnGlobalLayoutListener() {

            @SuppressWarnings("deprecation")
            public void onGlobalLayout() {
                srcPic.getViewTreeObserver().removeGlobalOnLayoutListener(this);
                initClipView(srcPic.getTop());
            }
        });

        sure = (View) this.findViewById(R.id.sure);
        sure.setOnClickListener(this);
    }

    /**
     * 初始化截图区域,并将源图按裁剪框比例缩放
     *
     * @param top
     */
    private void initClipView(int top) {
        bitmap = BitmapFactory.decodeResource(this.getResources(),
                R.drawable.pic);
        clipview = new ClipView(ClipPictureActivity.this);
        clipview.setCustomTopBarHeight(top);
        clipview.addOnDrawCompleteListener(new OnDrawListenerComplete() {

            public void onDrawCompelete() {
                clipview.removeOnDrawCompleteListener();
                int clipHeight = clipview.getClipHeight();
                int clipWidth = clipview.getClipWidth();
                int midX = clipview.getClipLeftMargin() + (clipWidth / 2);
                int midY = clipview.getClipTopMargin() + (clipHeight / 2);

                int imageWidth = bitmap.getWidth();
                int imageHeight = bitmap.getHeight();
                // 按裁剪框求缩放比例
                float scale = (clipWidth * 1.0f) / imageWidth;
                if (imageWidth > imageHeight) {
                    scale = (clipHeight * 1.0f) / imageHeight;
                }

                // 起始中心点
                float imageMidX = imageWidth * scale / 2;
                float imageMidY = clipview.getCustomTopBarHeight()
                        + imageHeight * scale / 2;
                srcPic.setScaleType(ScaleType.MATRIX);

                // 缩放
                matrix.postScale(scale, scale);
                // 平移
                matrix.postTranslate(midX - imageMidX, midY - imageMidY);

                srcPic.setImageMatrix(matrix);
                srcPic.setImageBitmap(bitmap);
            }
        });

        this.addContentView(clipview, new LayoutParams(
                LayoutParams.MATCH_PARENT, LayoutParams.MATCH_PARENT));
    }

    public boolean onTouch(View v, MotionEvent event) {
        ImageView view = (ImageView) v;
        switch (event.getAction() & MotionEvent.ACTION_MASK) {
        case MotionEvent.ACTION_DOWN:
            savedMatrix.set(matrix);
            // 设置开始点位置
            start.set(event.getX(), event.getY());
            mode = DRAG;
            break;
        case MotionEvent.ACTION_POINTER_DOWN:
            oldDist = spacing(event);
            if (oldDist > 10f) {
                savedMatrix.set(matrix);
                midPoint(mid, event);
                mode = ZOOM;
            }
            break;
        case MotionEvent.ACTION_UP:
        case MotionEvent.ACTION_POINTER_UP:
            mode = NONE;
            break;
        case MotionEvent.ACTION_MOVE:
            if (mode == DRAG) {
                matrix.set(savedMatrix);
                matrix.postTranslate(event.getX() - start.x, event.getY()
                        - start.y);
            } else if (mode == ZOOM) {
                float newDist = spacing(event);
                if (newDist > 10f) {
                    matrix.set(savedMatrix);
                    float scale = newDist / oldDist;
                    matrix.postScale(scale, scale, mid.x, mid.y);
                }
            }
            break;
        }
        view.setImageMatrix(matrix);
        return true;
    }

    /**
     * 多点触控时,计算最先放下的两指距离
     *
     * @param event
     * @return
     */
    private float spacing(MotionEvent event) {
        float x = event.getX(0) - event.getX(1);
        float y = event.getY(0) - event.getY(1);
        return (float) Math.sqrt(x * x + y * y);
    }

    /**
     * 多点触控时,计算最先放下的两指中心坐标
     *
     * @param point
     * @param event
     */
    private void midPoint(PointF point, MotionEvent event) {
        float x = event.getX(0) + event.getX(1);
        float y = event.getY(0) + event.getY(1);
        point.set(x / 2, y / 2);
    }

    public void onClick(View v) {
        Bitmap clipBitmap = getBitmap();
        ByteArrayOutputStream baos = new ByteArrayOutputStream();
        clipBitmap.compress(Bitmap.CompressFormat.JPEG, 100, baos);
        byte[] bitmapByte = baos.toByteArray();

        Intent intent = new Intent();
        intent.setClass(getApplicationContext(), PreviewActivity.class);
        intent.putExtra("bitmap", bitmapByte);

        startActivity(intent);
    }

    /**
     * 获取裁剪框内截图
     *
     * @return
     */
    private Bitmap getBitmap() {
        // 获取截屏
        View view = this.getWindow().getDecorView();
        view.setDrawingCacheEnabled(true);
        view.buildDrawingCache();

        // 获取状态栏高度
        Rect frame = new Rect();
        this.getWindow().getDecorView().getWindowVisibleDisplayFrame(frame);
        int statusBarHeight = frame.top;

        Bitmap finalBitmap = Bitmap.createBitmap(view.getDrawingCache(),
                clipview.getClipLeftMargin(), clipview.getClipTopMargin()
                        + statusBarHeight, clipview.getClipWidth(),
                clipview.getClipHeight());

        // 释放资源
        view.destroyDrawingCache();
        return finalBitmap;
    }

}
最后,效果图如下:
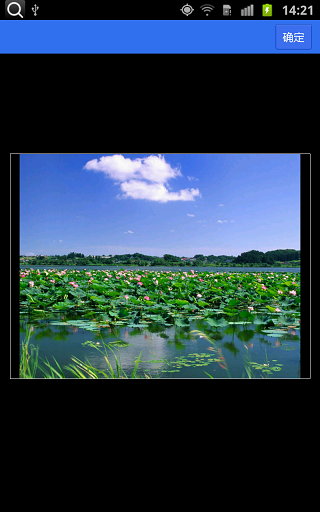
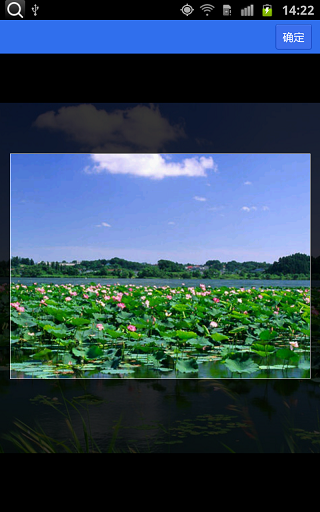
(图1.1)当用户选择图片后,初始化界面,大家可以看到,图片的高度符合裁剪框的高度,相应的图片宽度也按比例缩放。
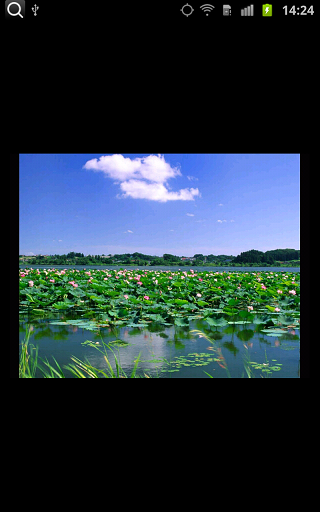
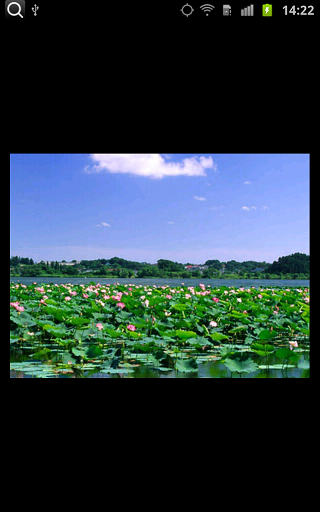
(图1.2)针对初始界面进行裁剪截图操作。
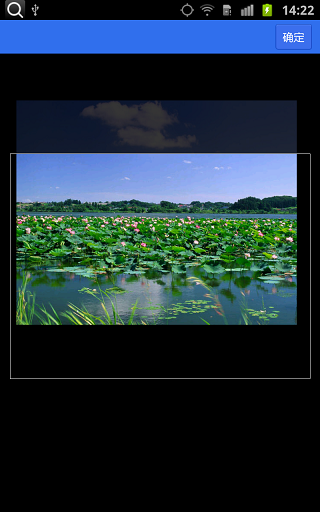
(图2.1)往上拖动图片,大家可以看到白云飘出裁剪框了。
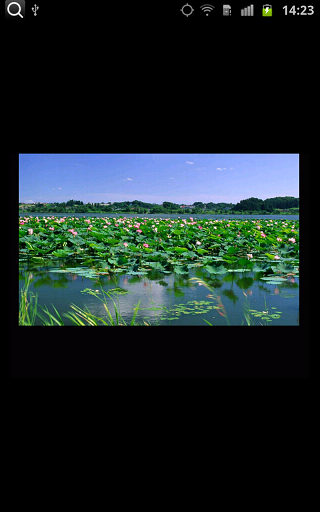
(图2.2)针对拖动图片进行裁剪截图操作,可以看到截图中没有白云了。
(图3.1)缩放图片,大家可以看到图片被放大了,只有一半白云,下方的湖面也少了。
(图3.2)针对缩放图片进行裁剪截图操作,同样可以发现操作成功了。
注意
本例中,Activity之间传递截图是以Bitmap形式传递的,这是大忌,这有可能因Bitmap过大而导致APP崩溃。本文完全是出于方便,读者在实际使用中需注意。
有疑问或者觉得不对的地方还请指正,谢谢。
Comments